
Driver App Manual

iDrv App Manual Draft
1. Getting Started – This section covers how to download and install the Jatt iDrv App on your device.
1.1 Installation – The most recent version is now available for download from the Android and iOS
App Stores.
1.2 Log in – The Jatt iDrv Login Interface is shown below. The administrator/managers will provide
you with login credentials.
Fig. 1 Login
2. Menu Bar Components – When you click the menu icon in the upper left corner of the dashboard page, these
components appear. You will see a list of the 14 components of the Jatt iDrv App. It includes the Dashboard,
Profile, Fuel, Jobs, Compliance, Payroll, Logbook, Report, Weekly Inspection, Vehicle Inspection, Documents,
Induction and Licences, Contacts, and Logout.
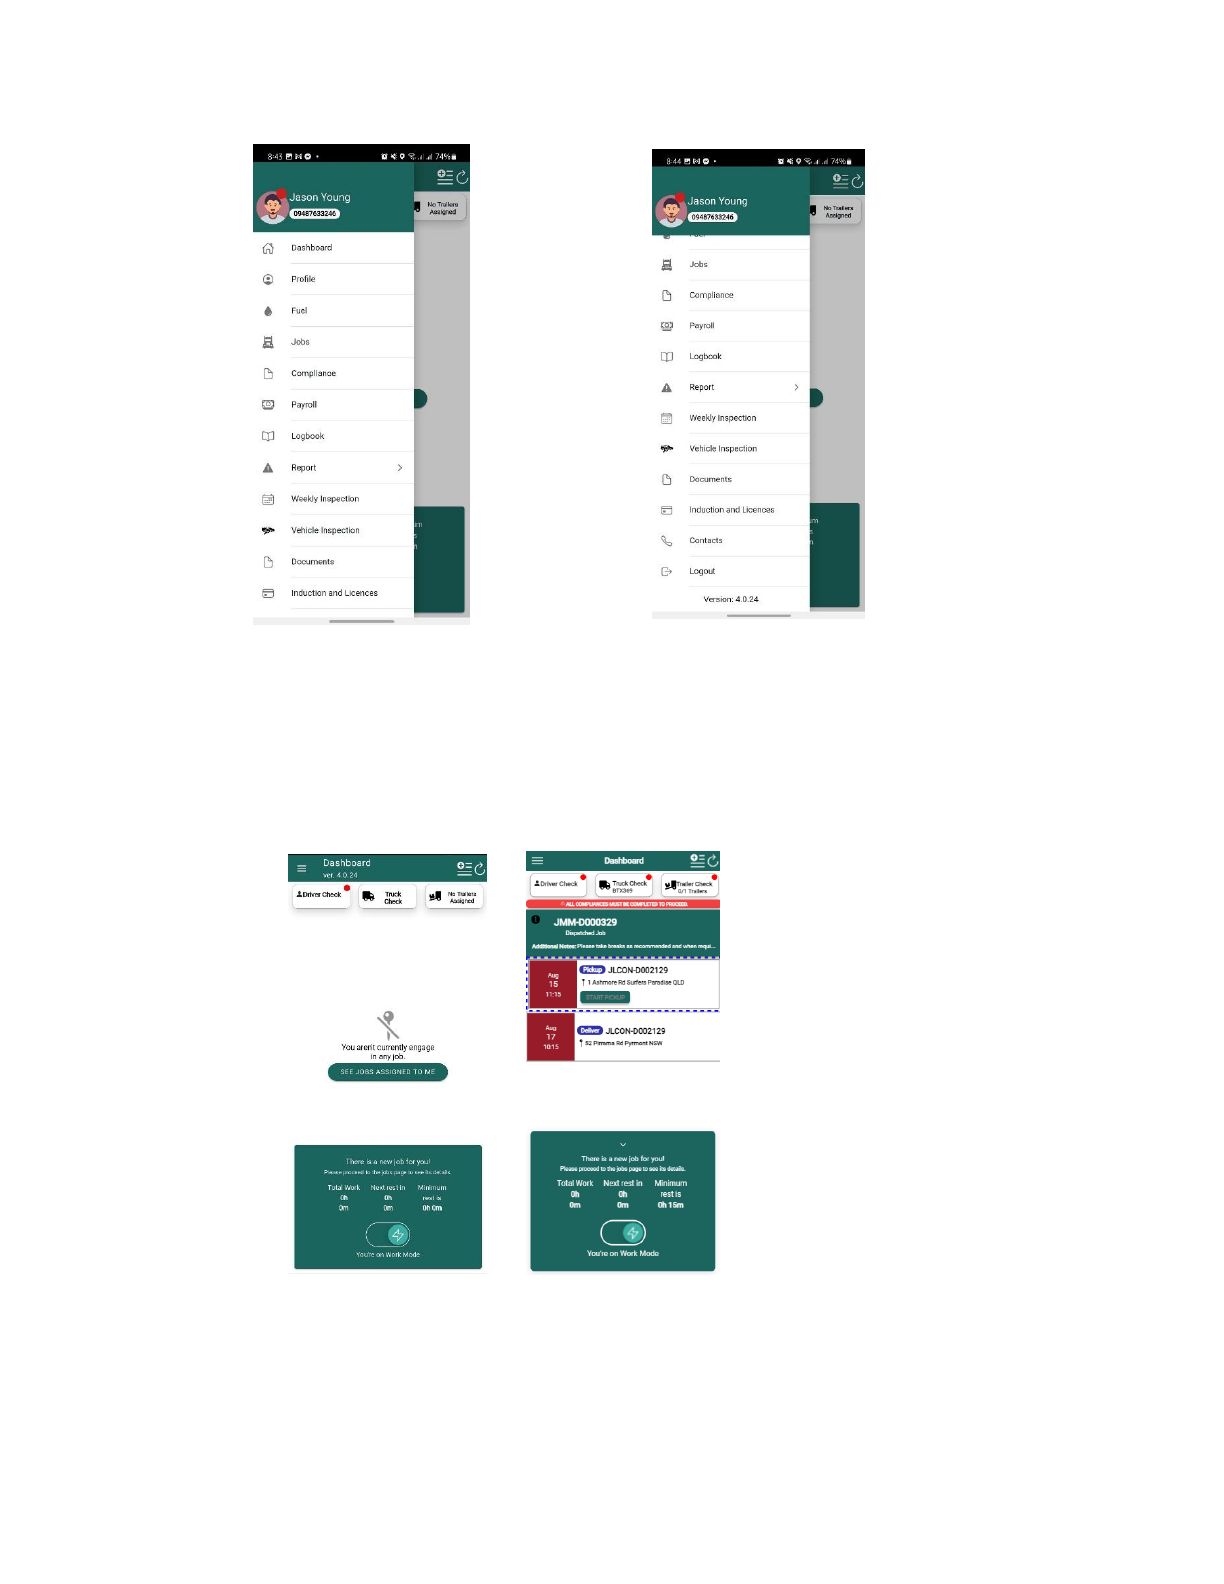
Fig 2. Menu Bar Components Fig 3. Menu Bar Components Continuation
1. Dashboard Page – This component displays the jobs that have been assigned to you. After accepting
a job, the dashboard will give you an overview of the specific job you've been assigned to complete.
It also has a compliance tab, which includes the Driver Check, Truck Check, and Trailer Check, all
of which must be completed before proceeding to the job.
Fig 4. Dashboard Fig 5. Dashboard 2
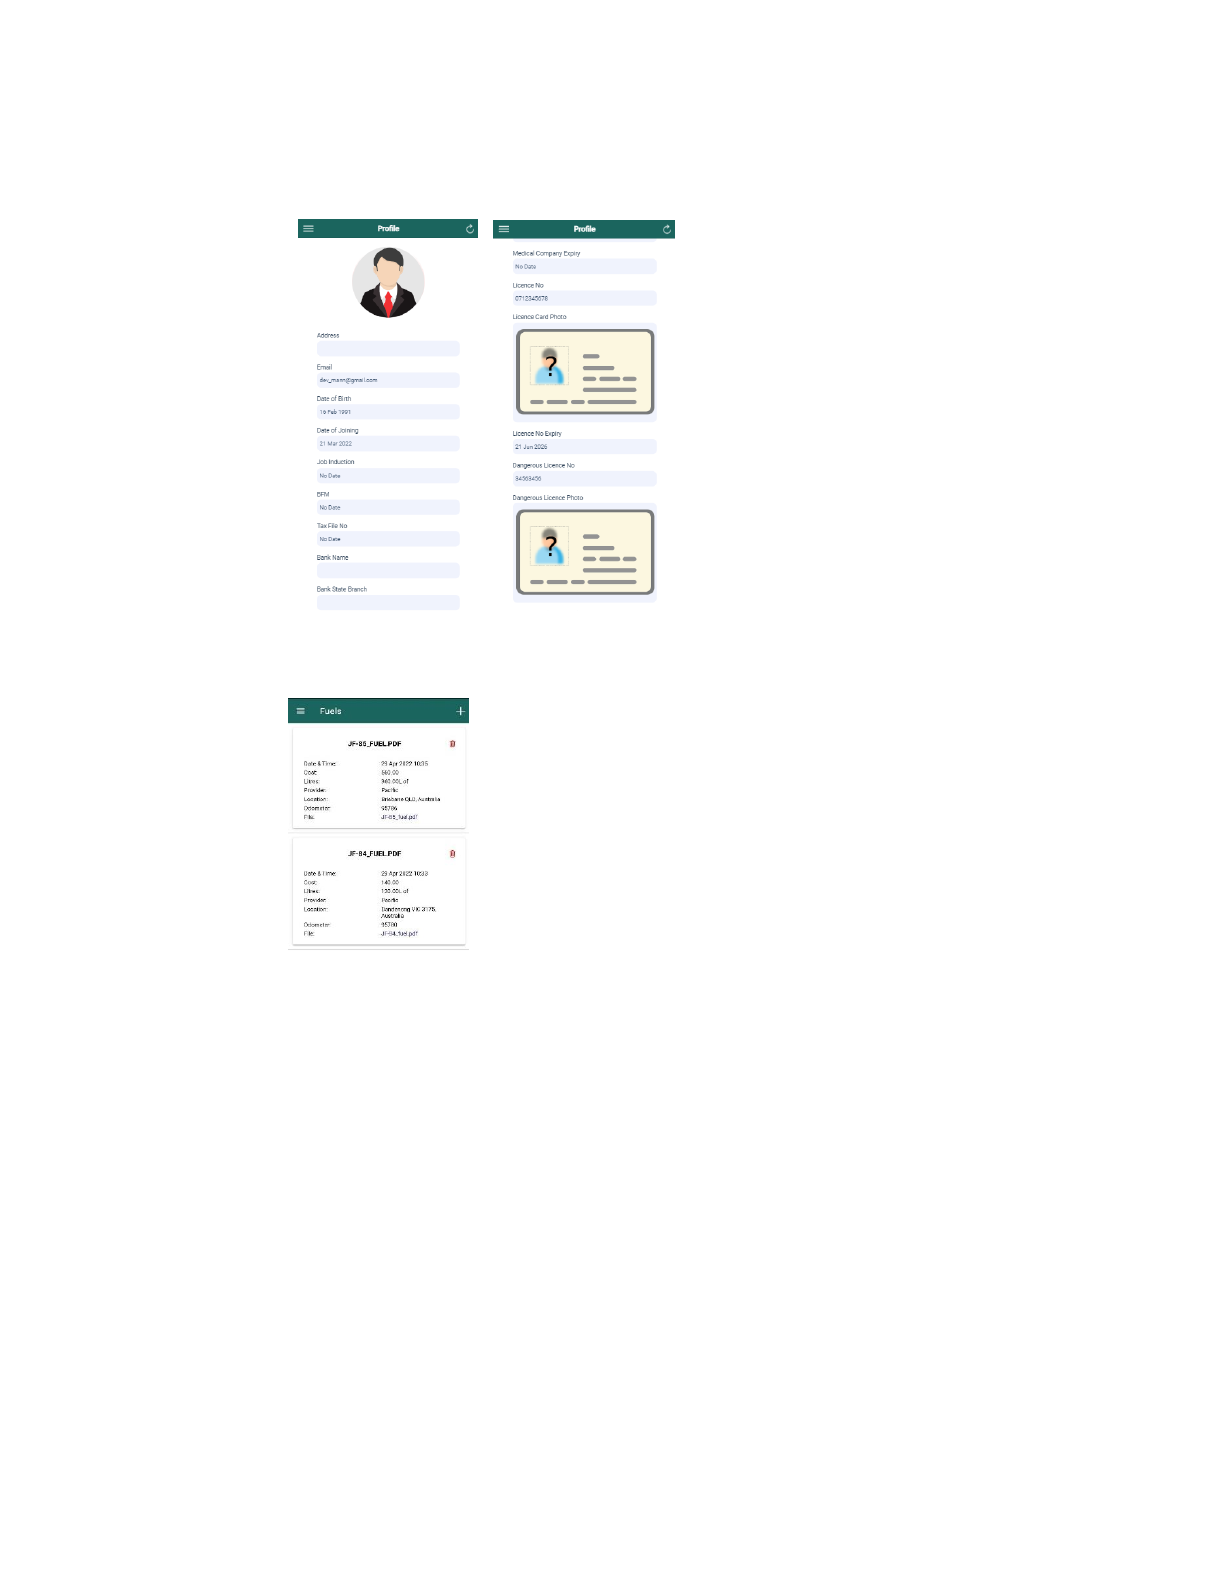
2. Profile – This component displays your profile information, which includes personal information, other
information, licenses, and other documents.
Fig 6. Profile Fig 7. Profile 2
3. Fuel – The fuel tab displays detailed information about your fuel records.
Fig 8. Fuel
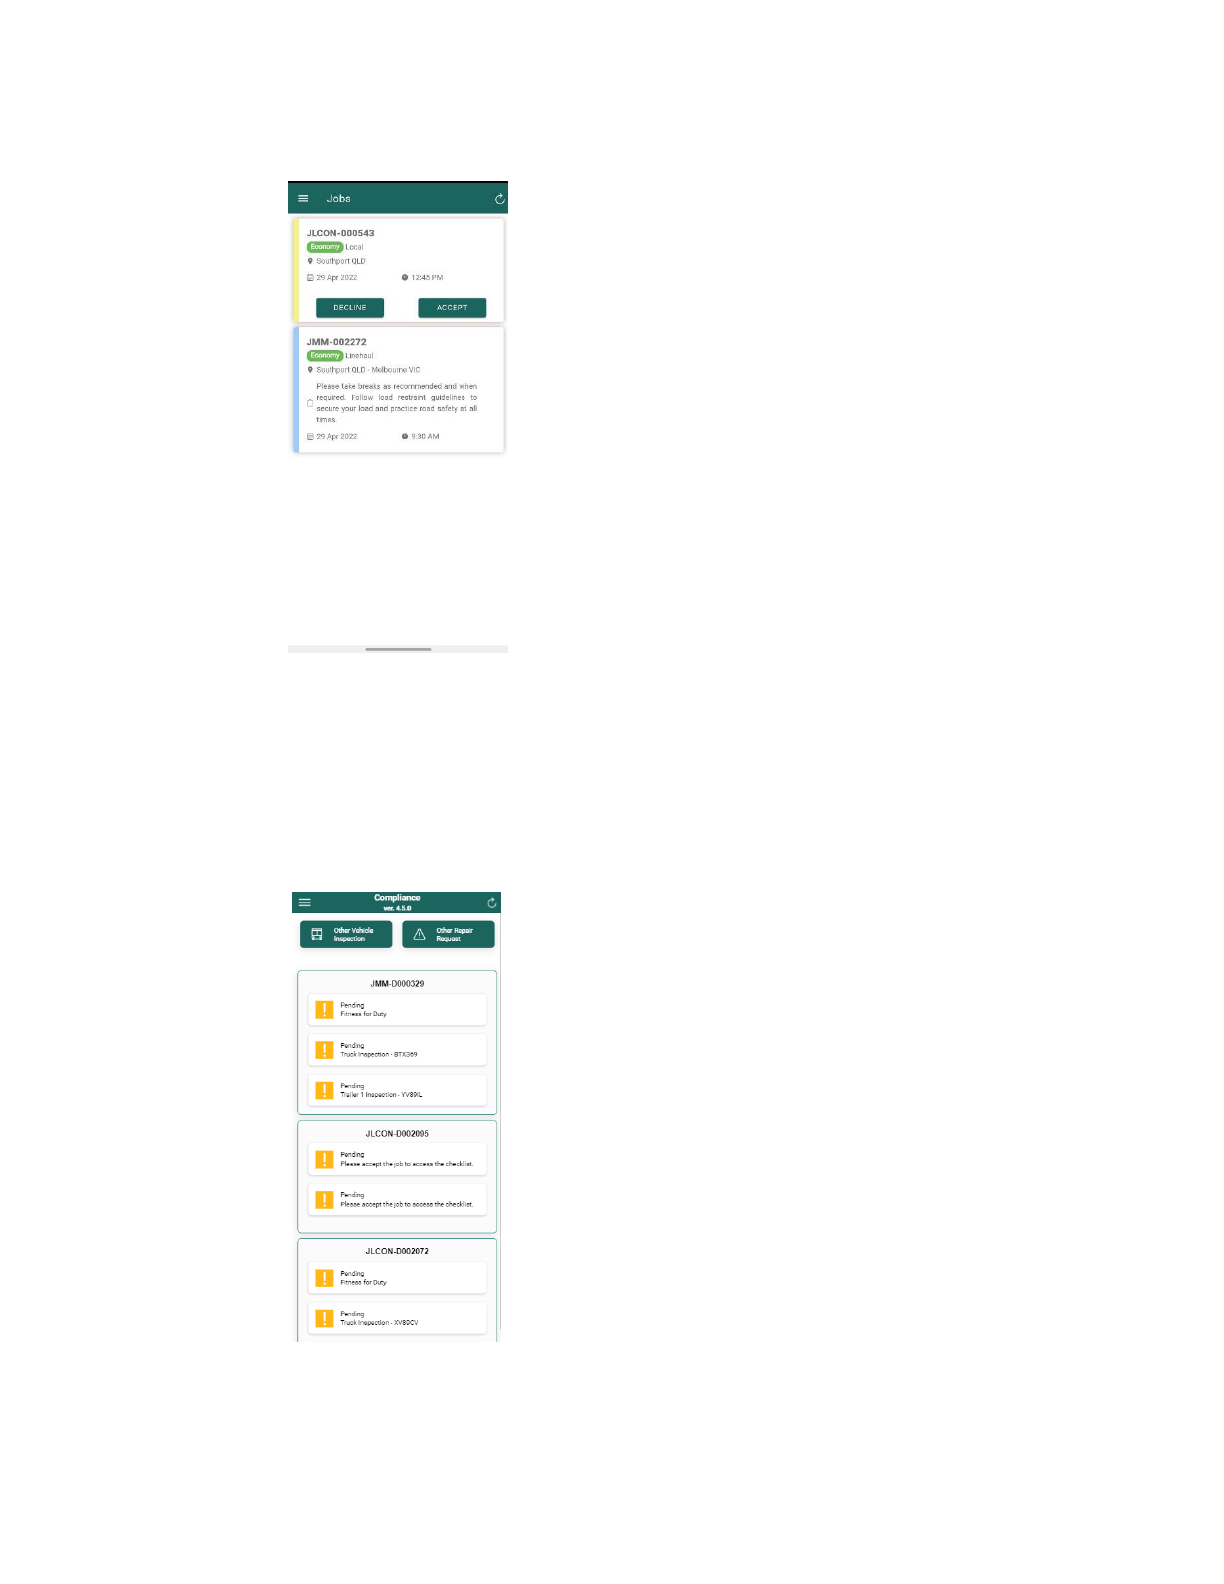
4. Jobs – This component displays detailed information about the jobs assigned to you.
Fig 8. Jobs
5. Compliance – This component displays the compliance requirements, such as the Driver Test and
Truck and Trailer/s Inspection, that must be met prior to starting the job. Additionally, it includes a
section labeled, "Other Vehicle Inspection" that contains a list of vehicles for inspection, as well as a
section titled "Other Repair Request" that contains a list of vehicles and their report history. You can
also add a request for vehicle repair in this section.
Fig 9. Compliance
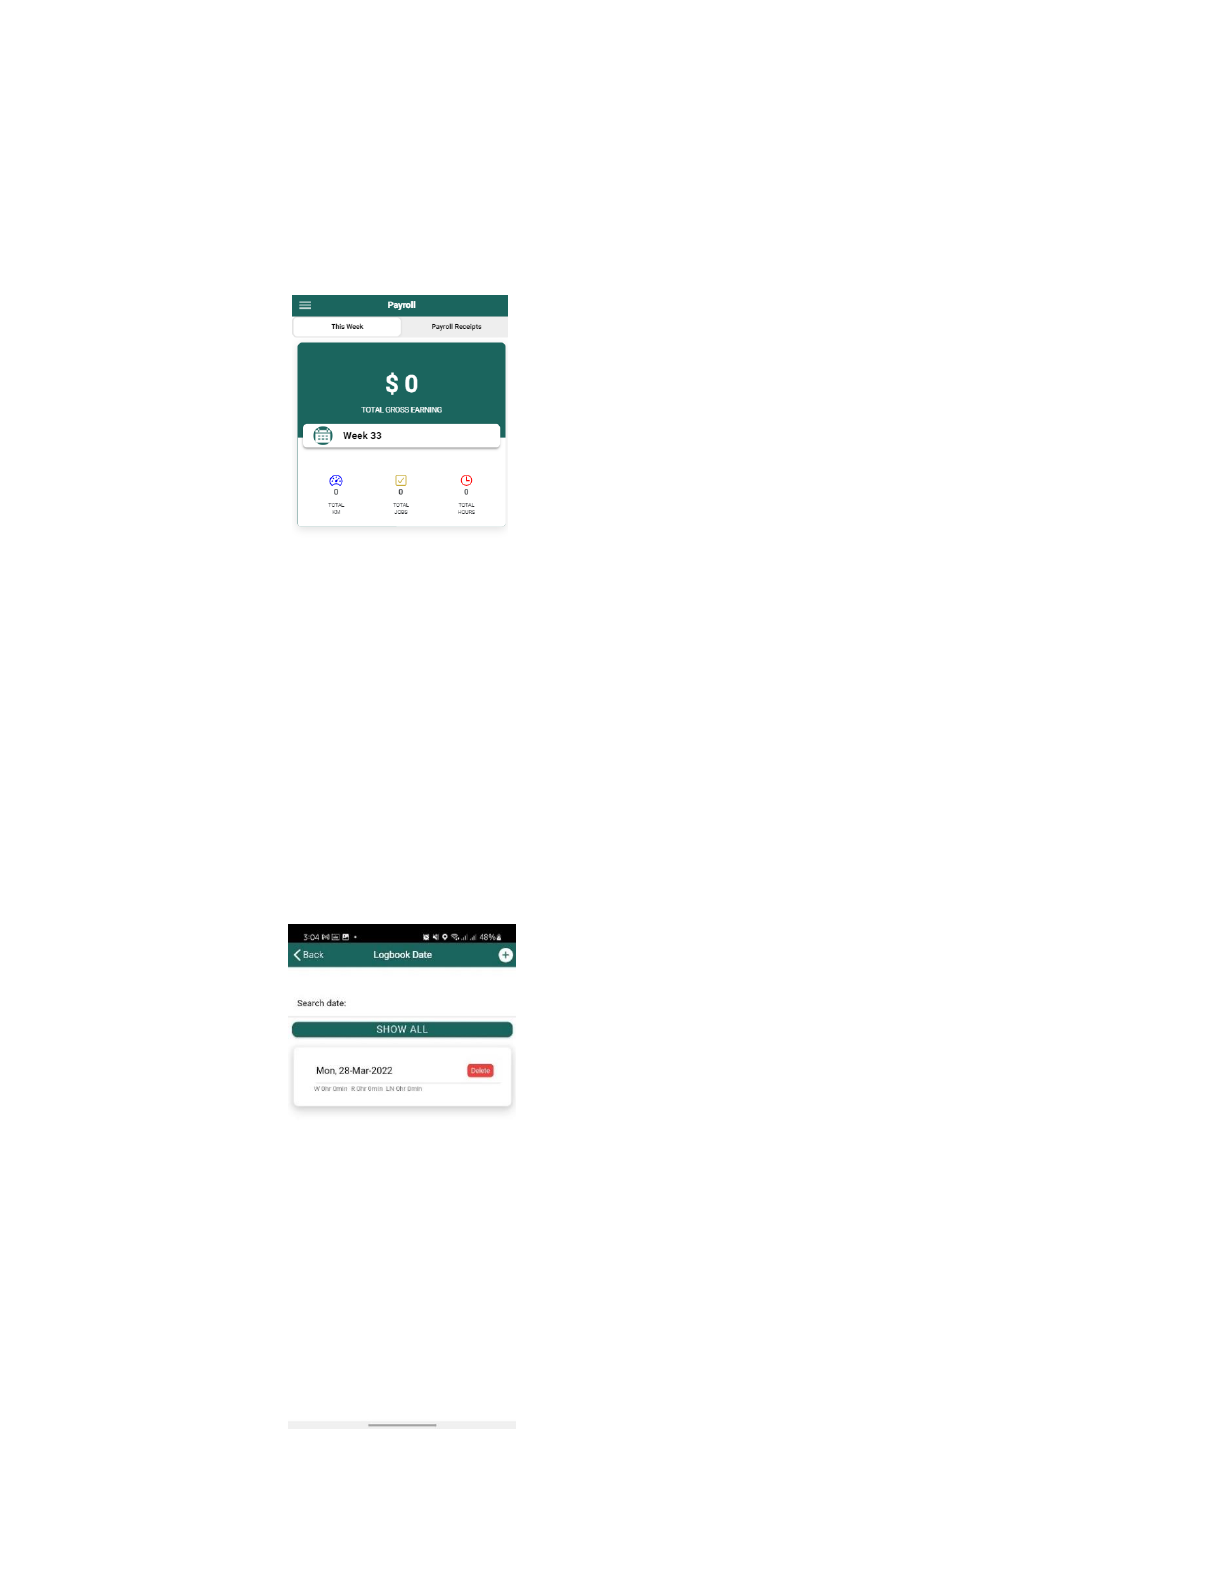
6. Payroll – This component displays your total gross earnings for the current week. It also includes
your payroll receipts as well as a summary of the jobs you completed, total kilometers traveled, and
total hours.
Fig 10. Payroll
7. Logbook – This component requires you to create log sheets to record your daily activities,
specifically the work and rest hours in a specific job that can be accomplished while you’re in rest
mode.
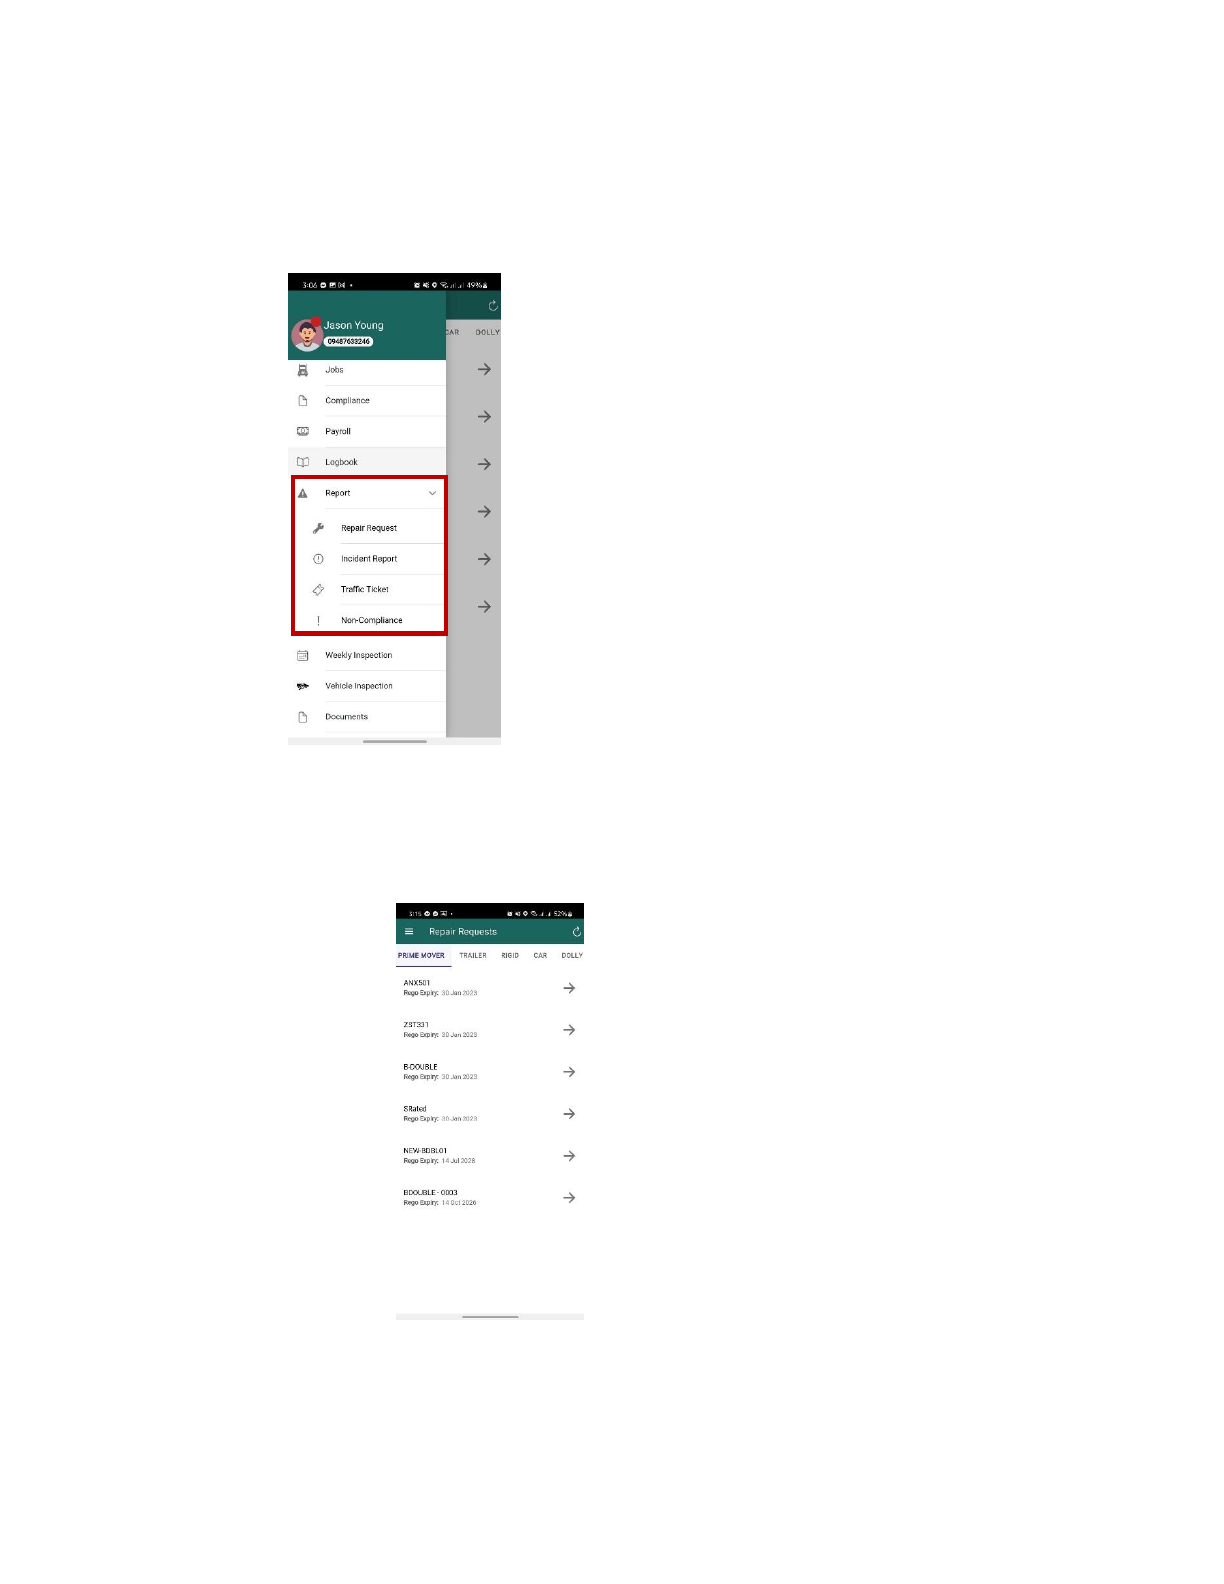
Fig 11. Logbook
8. Report – This is where you record important reports such as a repair request, an incident report, a
traffic ticket, and a non-compliance.
Fig 12. Report
2.8.1 Repair Request – You can use this page to submit a repair request for a specific vehicle
that has been damaged.
Fig 13. Repair Request
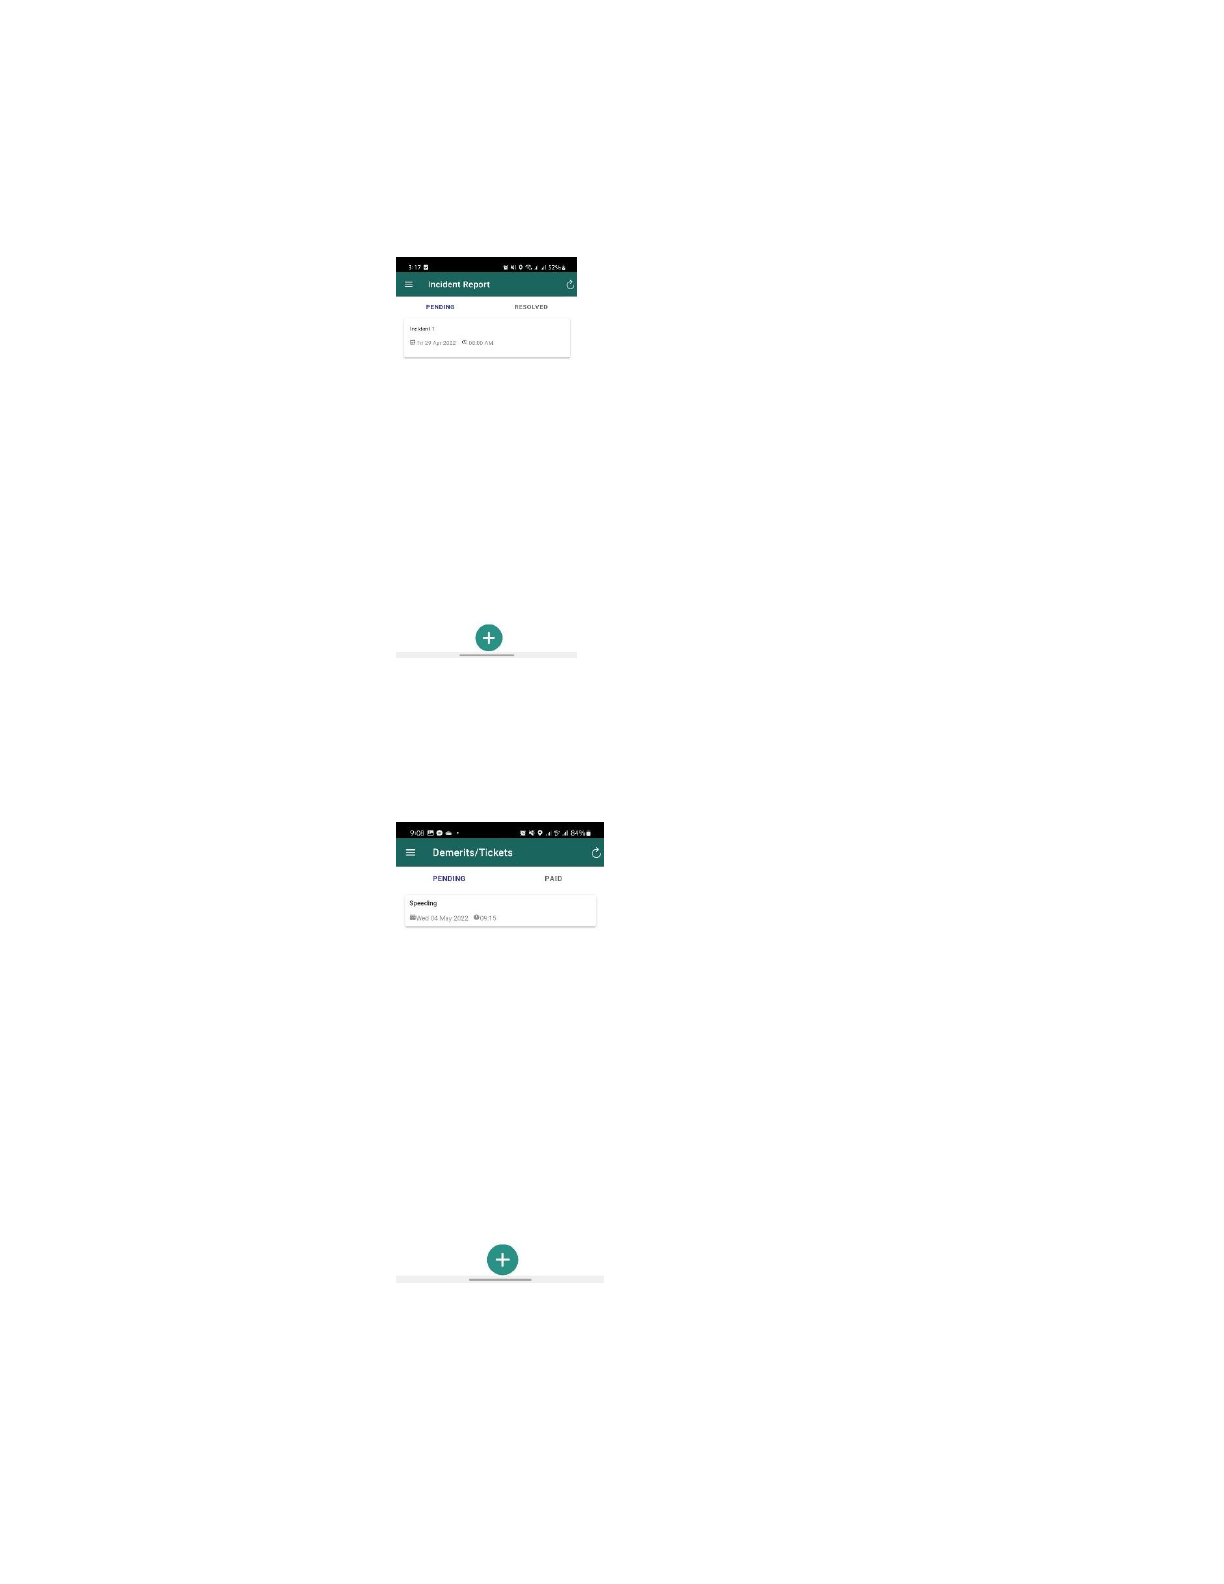
2.8.2 Incident Report – This report is intended to be completed in the event of a workplace
incident that results in an accident or near-miss. Also, the report must be submitted
within 24 hours of the incident.
Fig 14. Incident Report
2.8.3 Traffic Ticket – When you encounter a traffic ticket violation, you can detail the event
here, including when and where it occurred, the demerit, the cost, and the status. The
status could be pending or paid. Following that, a pdf document will be generated.
Fig 15. Demerits/Tickets
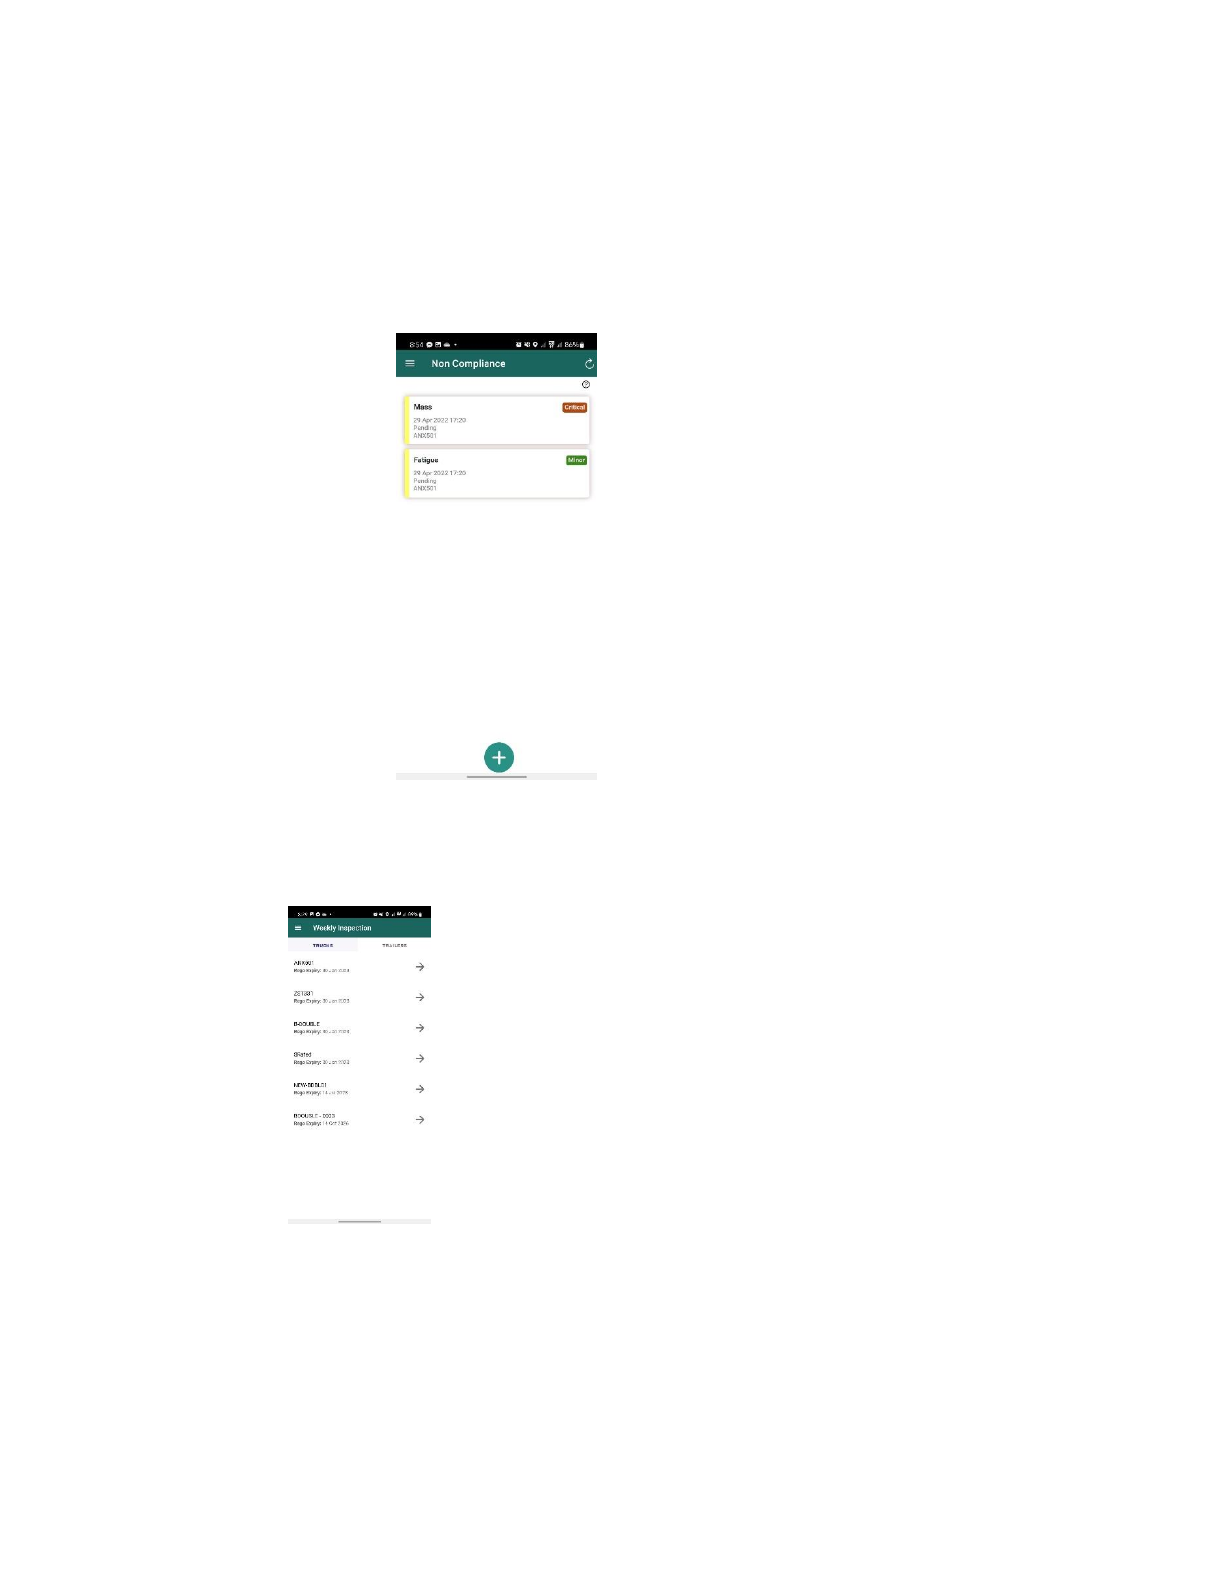
2.8.4 Non-Compliance – The Non-Compliance section refers to the breach a driver has
committed. It discusses the breach category, code, and classification. The
classification could be fatigue, mass, load restraint, speeding, or fleet checks. In this
form, the driver must provide all the details in order to generate a document.
Fig 16. NCR
9. Weekly Inspection – This component enables you to conduct a weekly inspection on Trucks and
Trailers by completing the weekly form.
Fig 17. Wkly Inspection
10. Documents – This component provides you with the necessary company documents, such as the
NHVAS Accreditation Certificate, Dangerous Goods (DG) Vehicle permit, and other permits, as well
as resources such as manuals and handbooks.
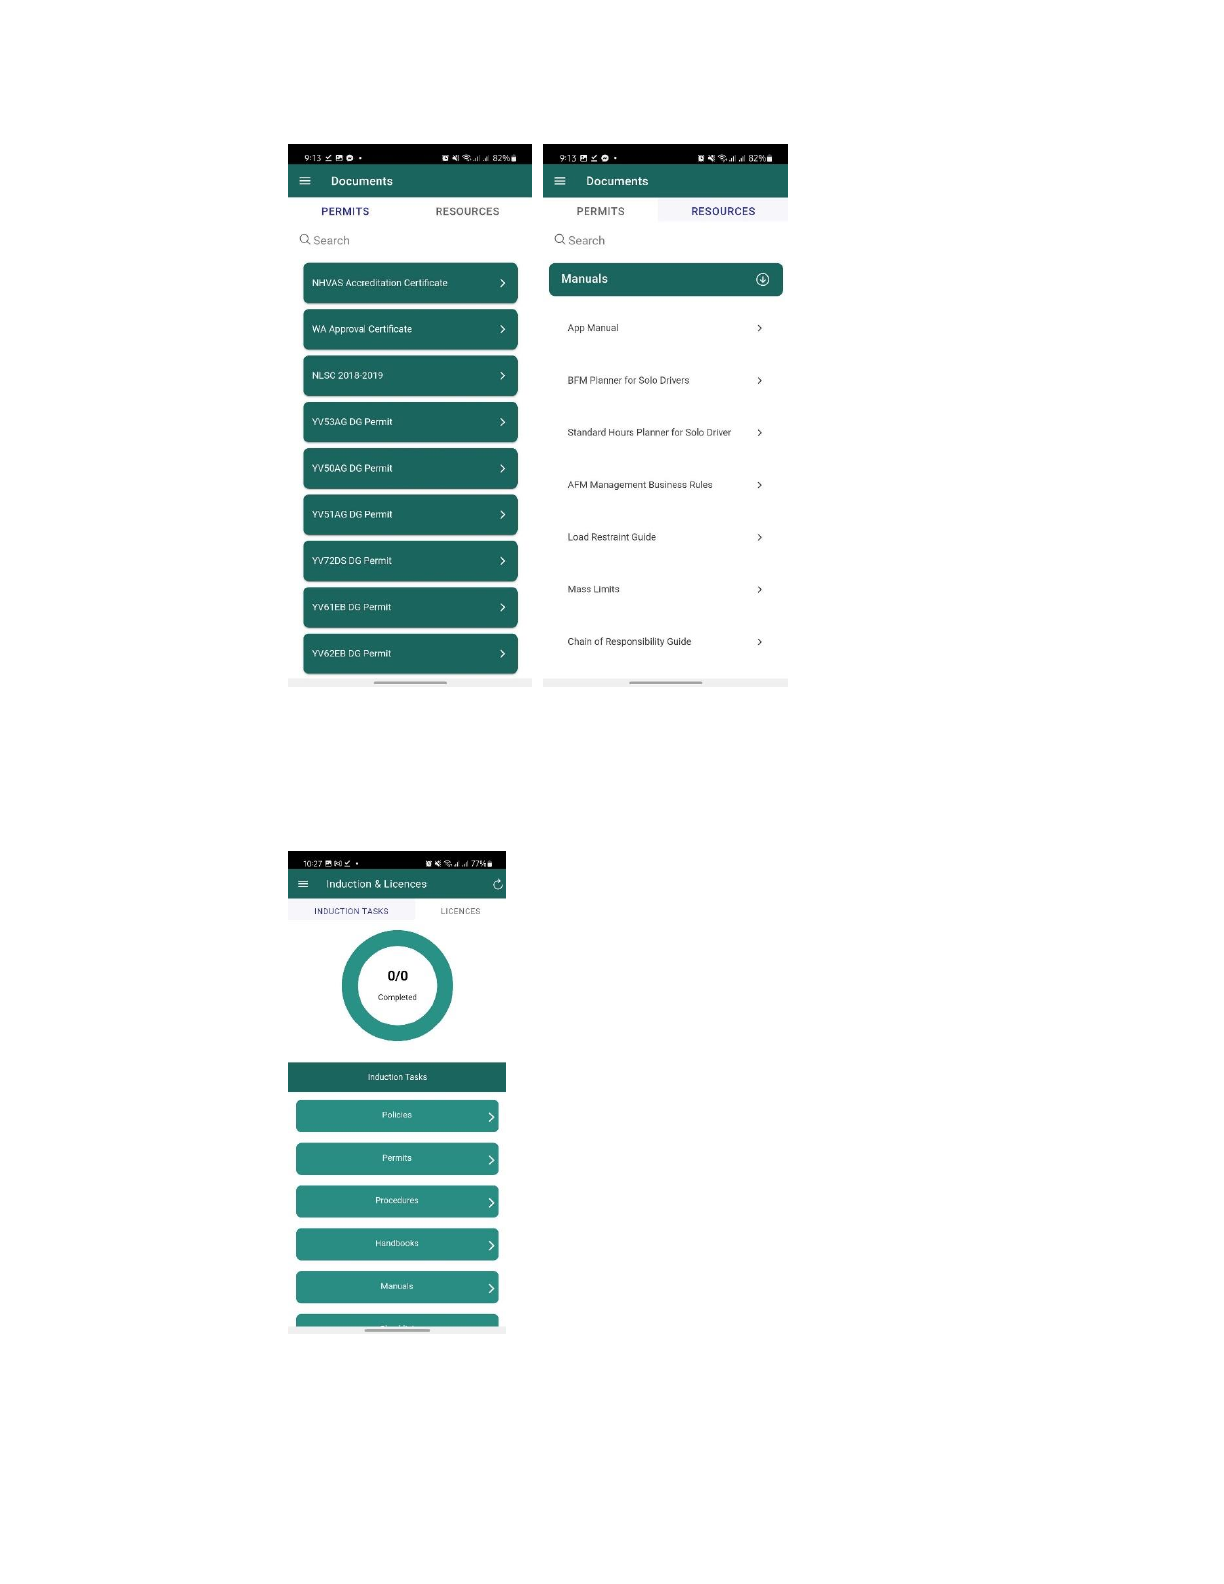
Fig 18. Doc 1 Fig 18. Doc 2
11. Induction and Licenses – This component is an informational display for viewing/listing the Driver's
completed and pending inductions or licenses. It also allows the driver to see if he needs to re-induct
if his induction file and licenses have already expired.
Fig 19. Induction & Licenses
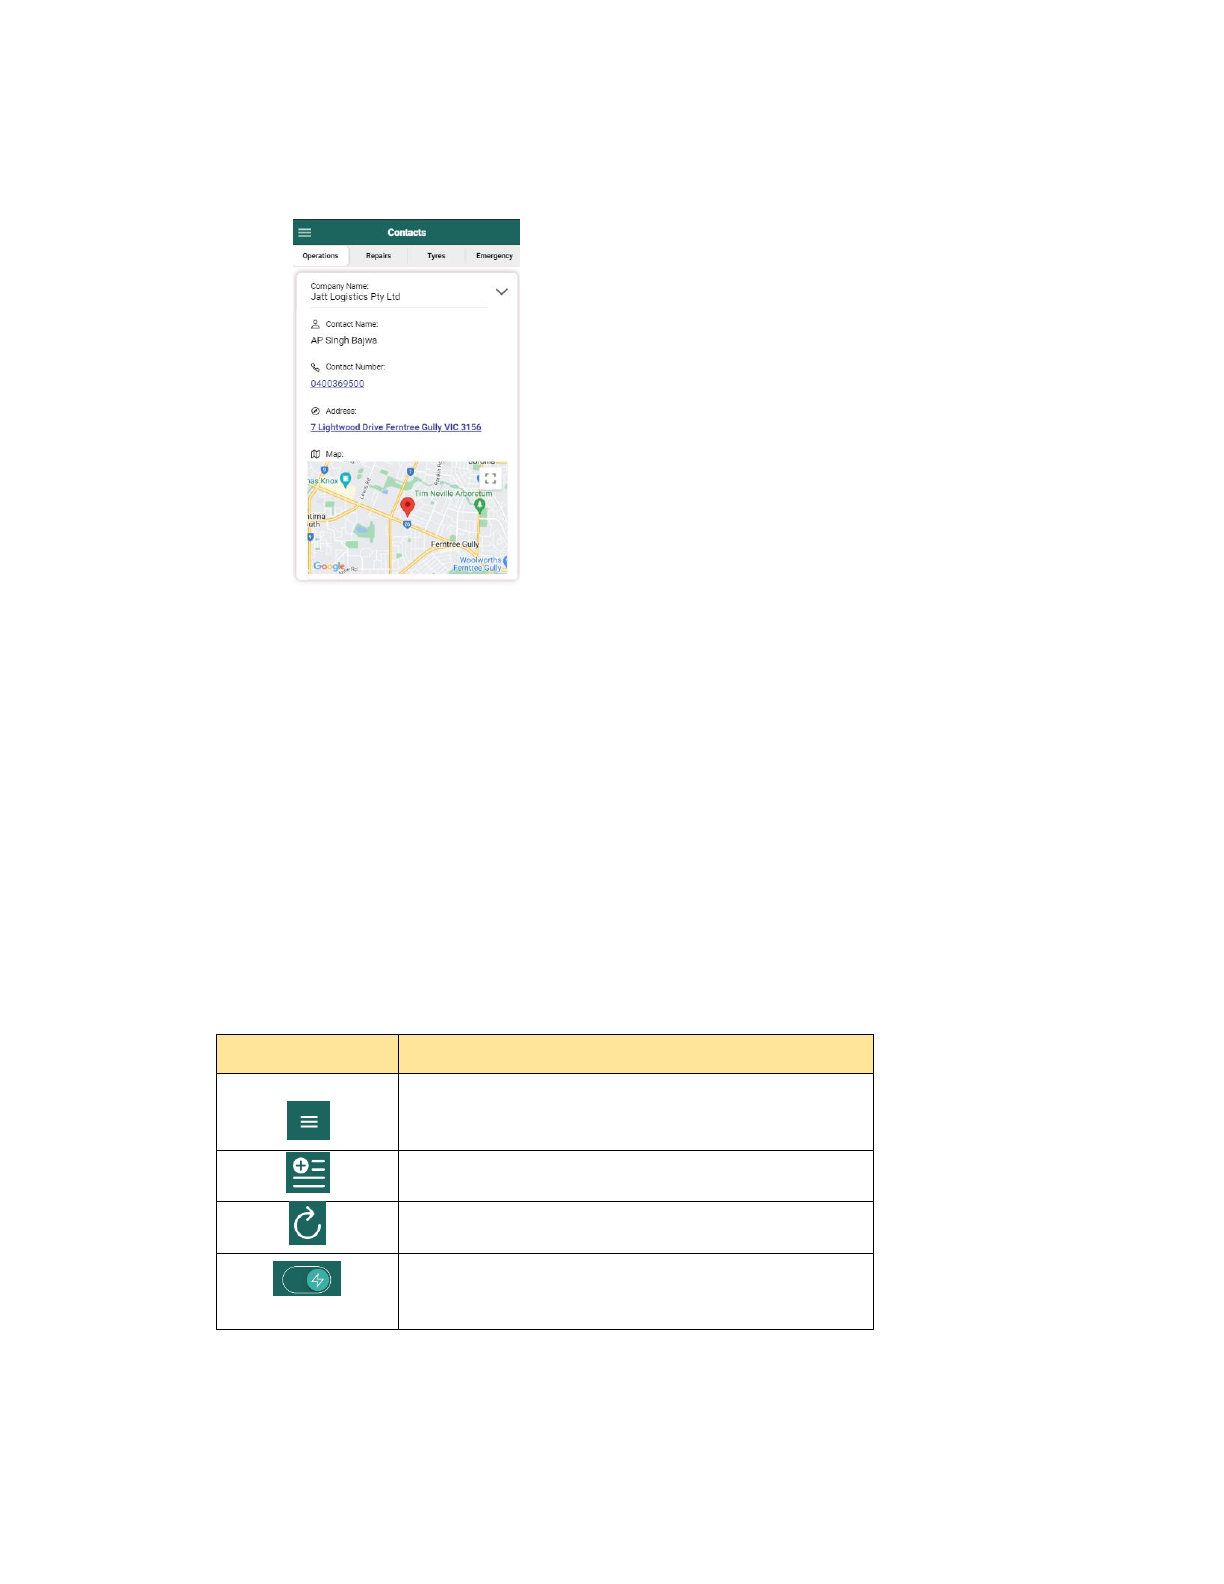
12. Contacts – This component displays a list of necessary contacts for operations, repairs, tyres, and
emergency situations.
Fig 20. Contacts
13.Log out
3. Buttons and Operations
3.1 Dashboard Component
Buttons
Name & Definition
Menu icon – to view the list of the menu bar’s
components.
Add task - to add a specific task such as refuel.
Refresh – to refresh and update the current page.
Toggle button – to determine that the driver is on work
mode.
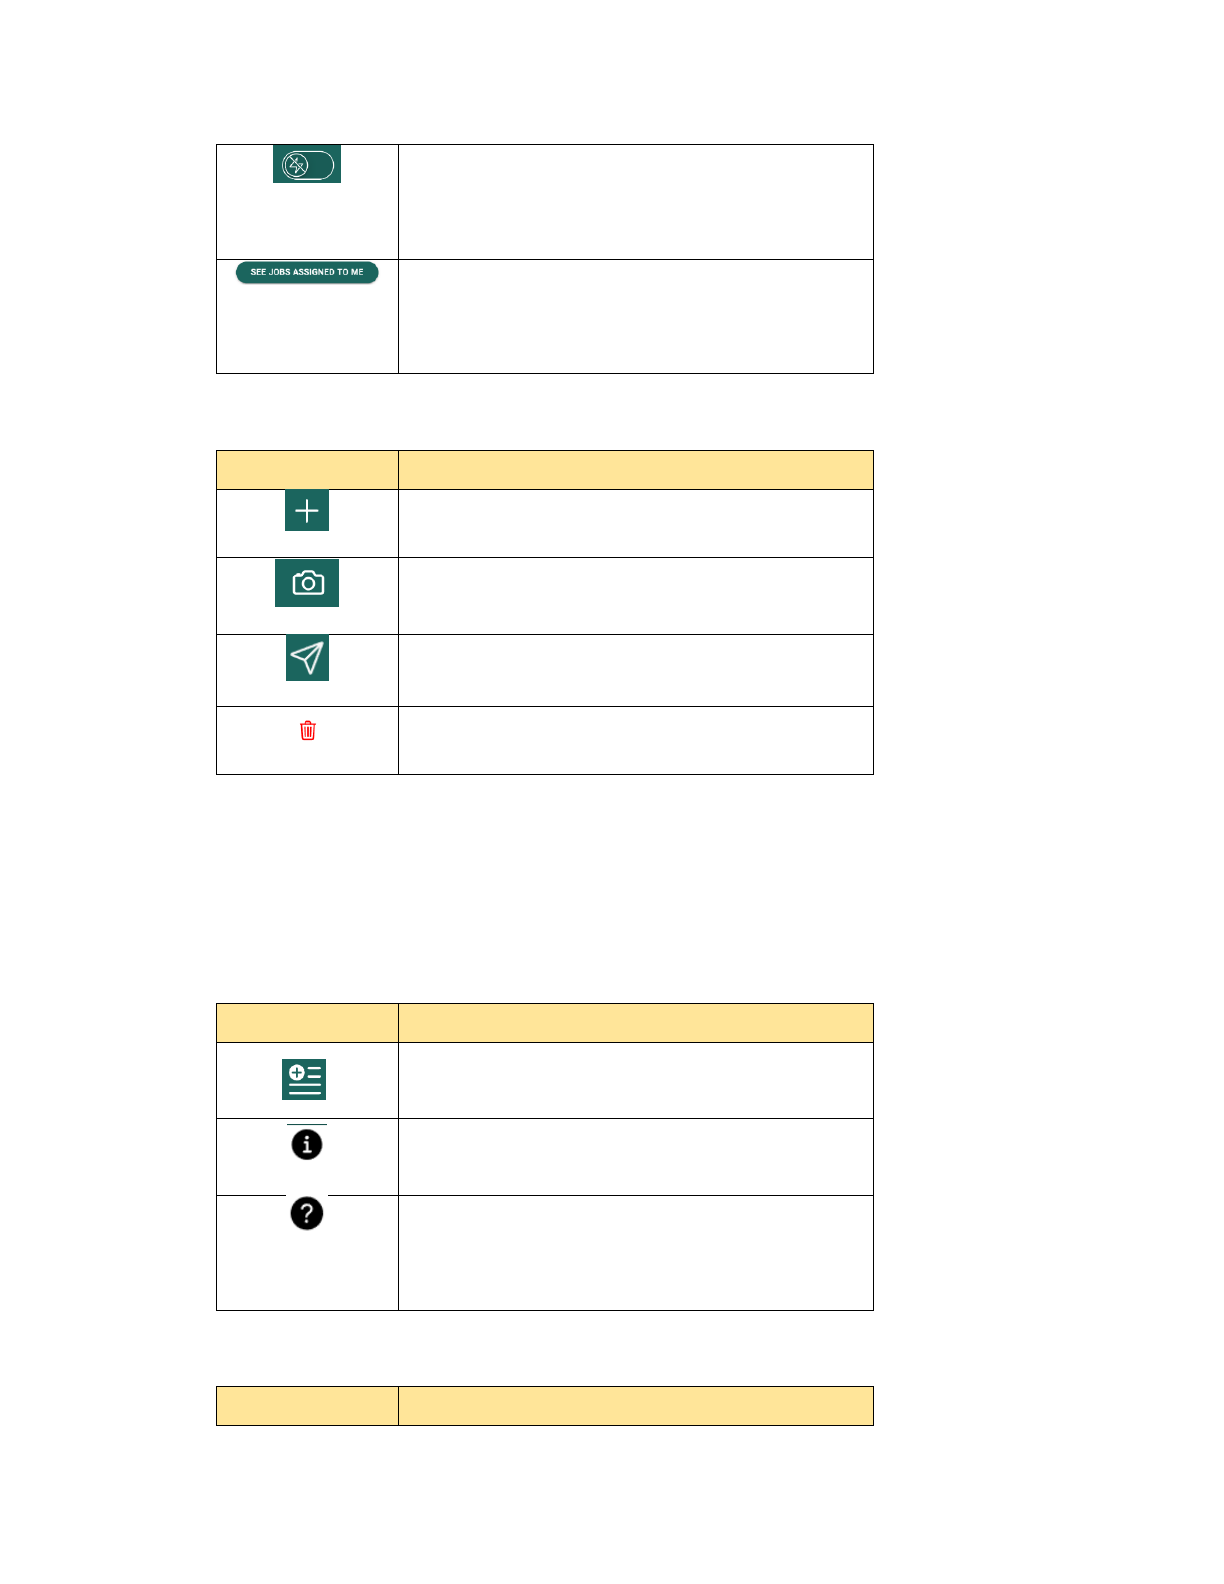
Toggle button – to determine that the driver is on rest
mode and allows the driver to create a log sheet for his
daily activities.
This button appears in the dashboard if you have no job
at the moment. You may click this to check your job’s
page.
3.2 Fuel Component
Buttons
Name & Definition
Add fuel – to add a fuel record.
Camera – to take a photo of the fuel receipt or to upload
one from the gallery.
Submit – to submit a fuel record.
Delete – to delete a fuel record.
3.3 Jobs Component
Buttons
Name & Definition
Add task - to add specific tasks such as adding pick up,
breakdown, refuel, release, and upload paperwork.
Legend – this serves as a guide for the status of every
task.
Legend – this icon displays information about the driver's
current job, such as the job route, date, service type,
estimated total kilometers, and total hours.
3.4 Report Component
Buttons
Name & Definition
Legend – in repair request section, this is used as a
reference to determine whether the damage report is
negligible, minor, moderate, or critical.
Legend – this section provides details about the non-
compliance report's status, which may be pending,
processing, resolved, terminated, or cancelled.
4. Color Coding
4.1 Jobs Component
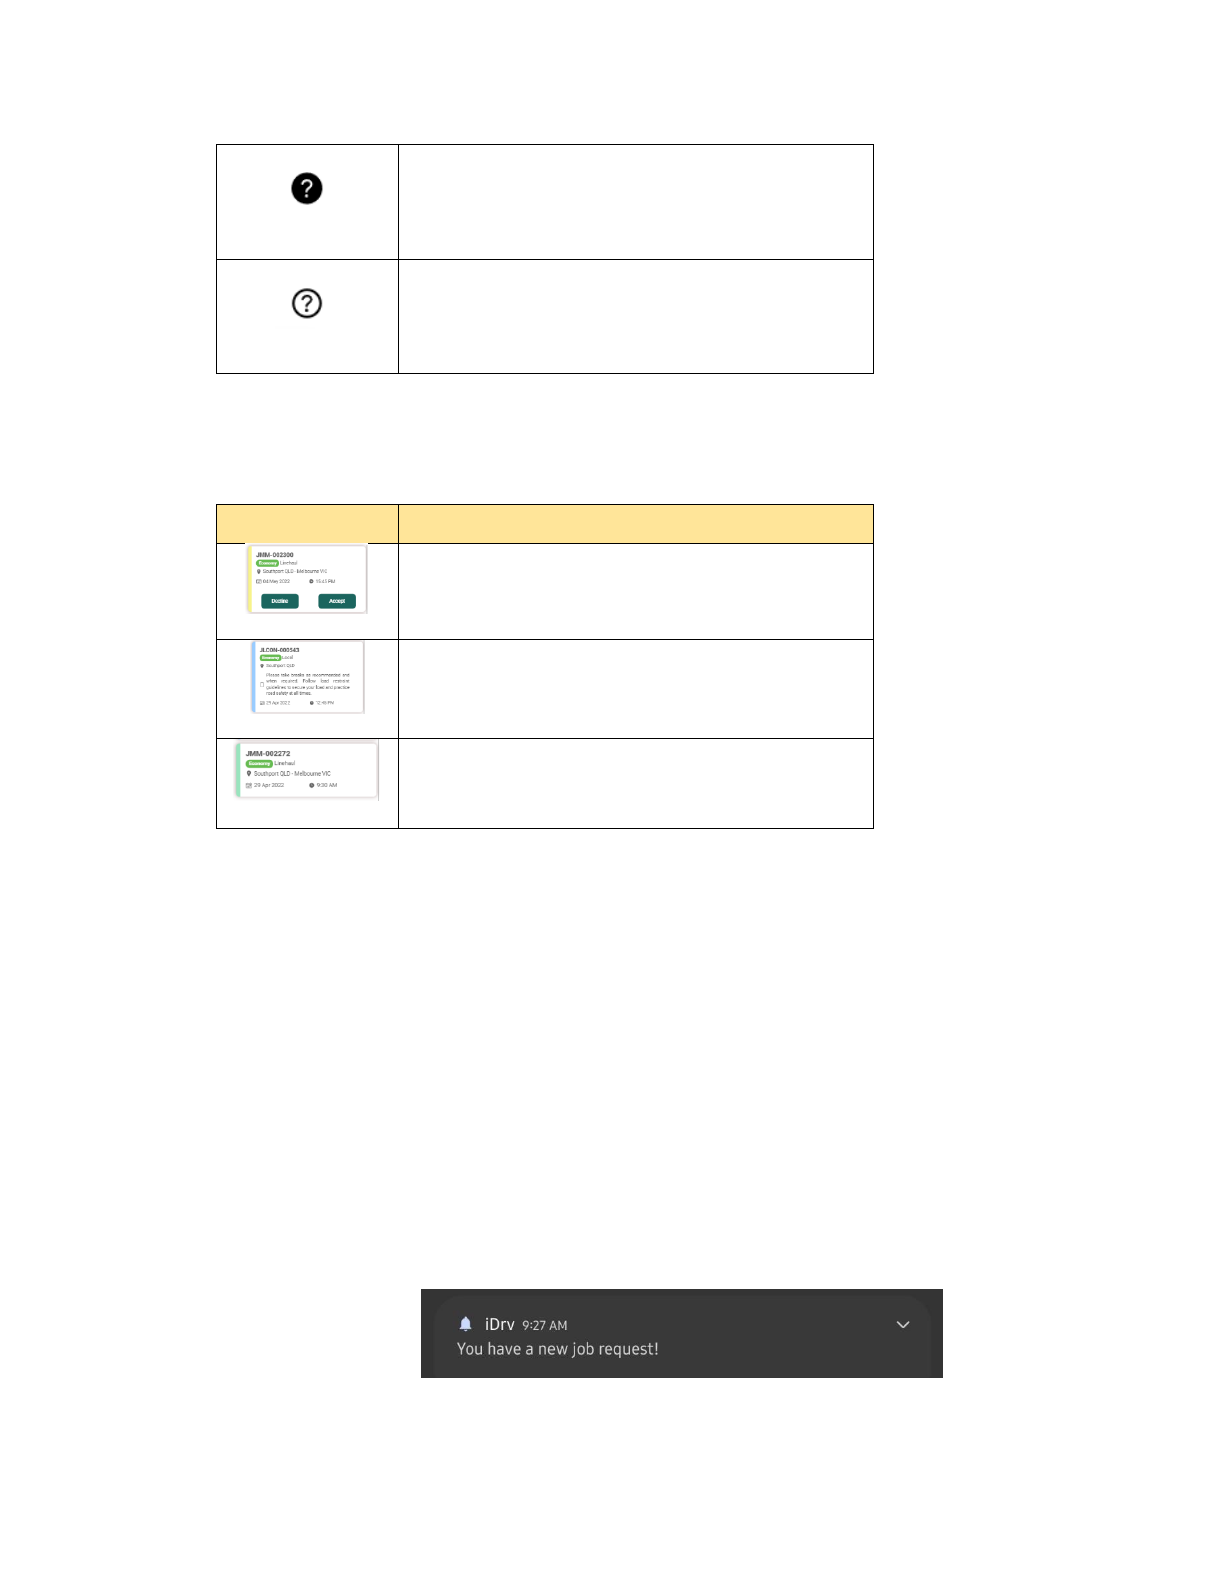
Buttons
Name & Definition
Dispatched – the job has been dispatched and is waiting
for the driver to accept it.
Processing – the job was accepted, and it is now carrying
out the job operation.
Completed – the job has already been completed and
accomplished.
5. Operating Instructions
A. How to Process a Local Job?
- This type of job transports loads within the same state, for example, Victoria to Victoria,
Queensland to Queensland, or New South Wales to New South Wales.
5.1 Local Start
Step 1. A notification will appear in your phone indicating that there is a new job assigned to
you.
Fig 21. Notification
Step 2: Open the app and navigate to dashboard, then click the “See Jobs Assigned to Me”
button which will redirect you to the Jobs page.
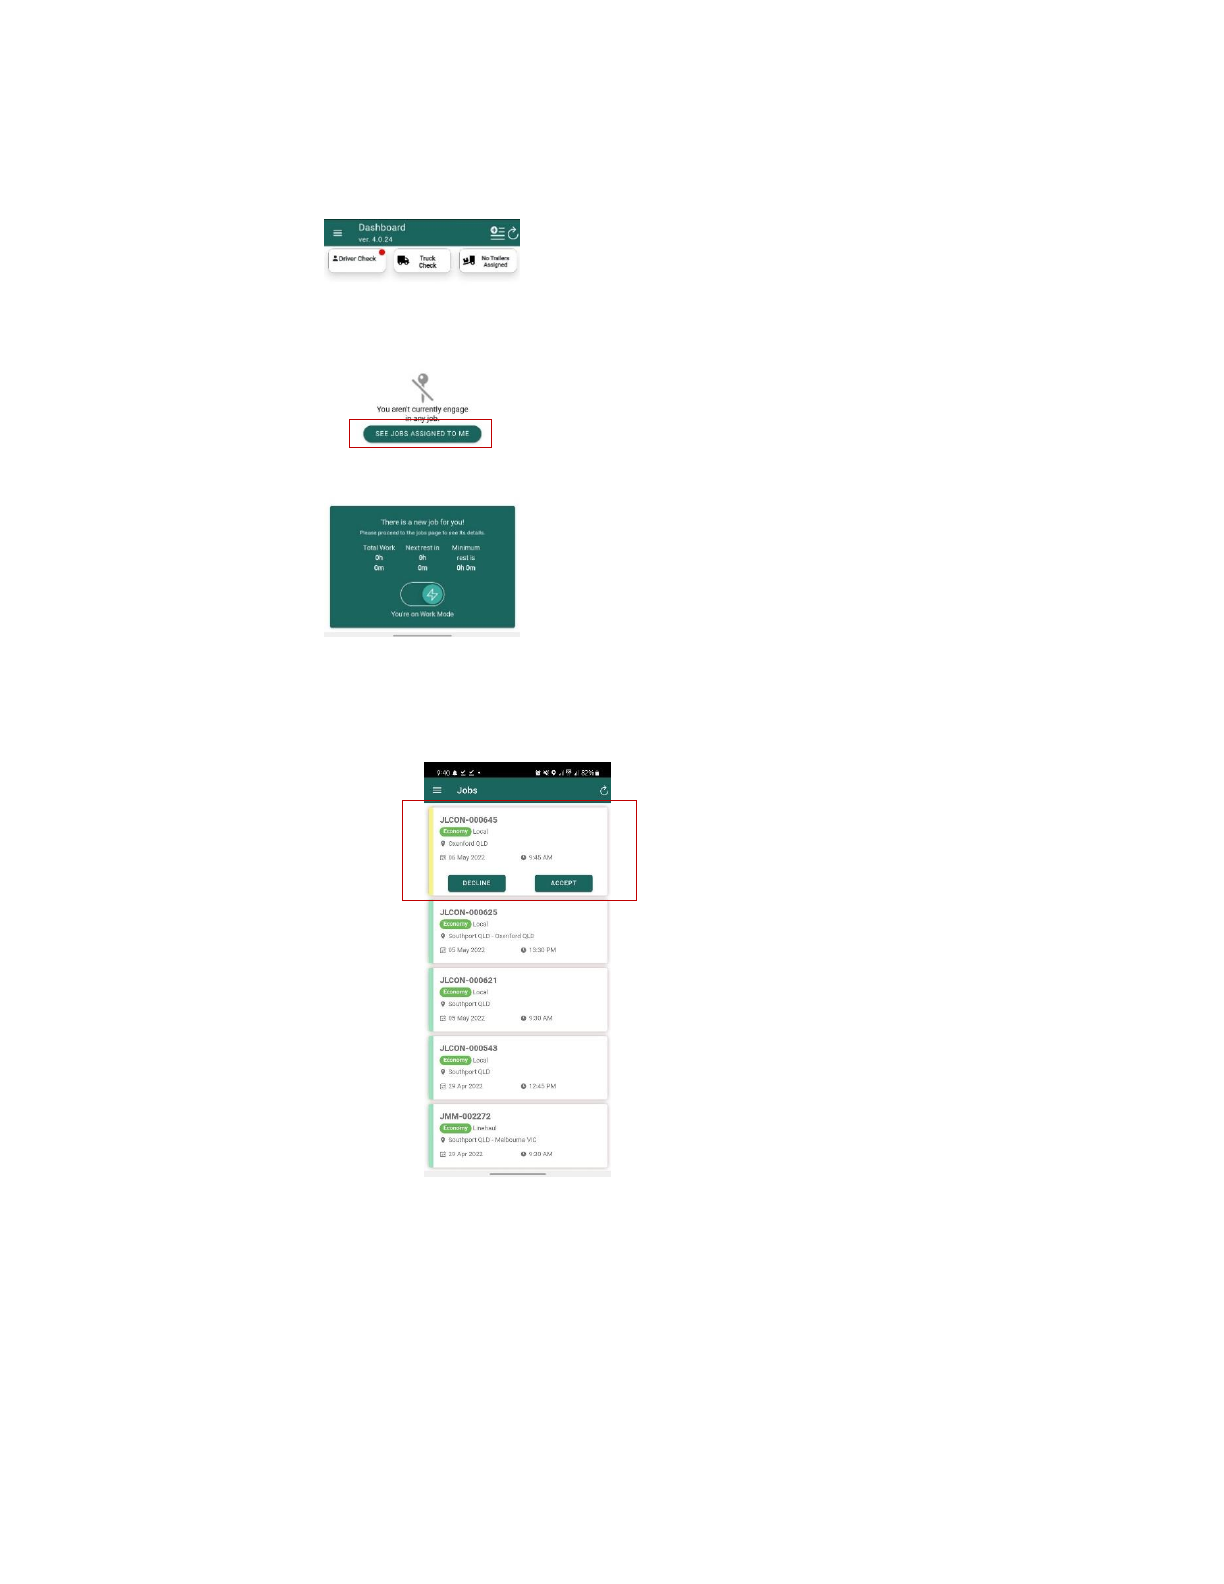
Step 3. In the Jobs page, click Accept.
(Fig 22. Local Start)
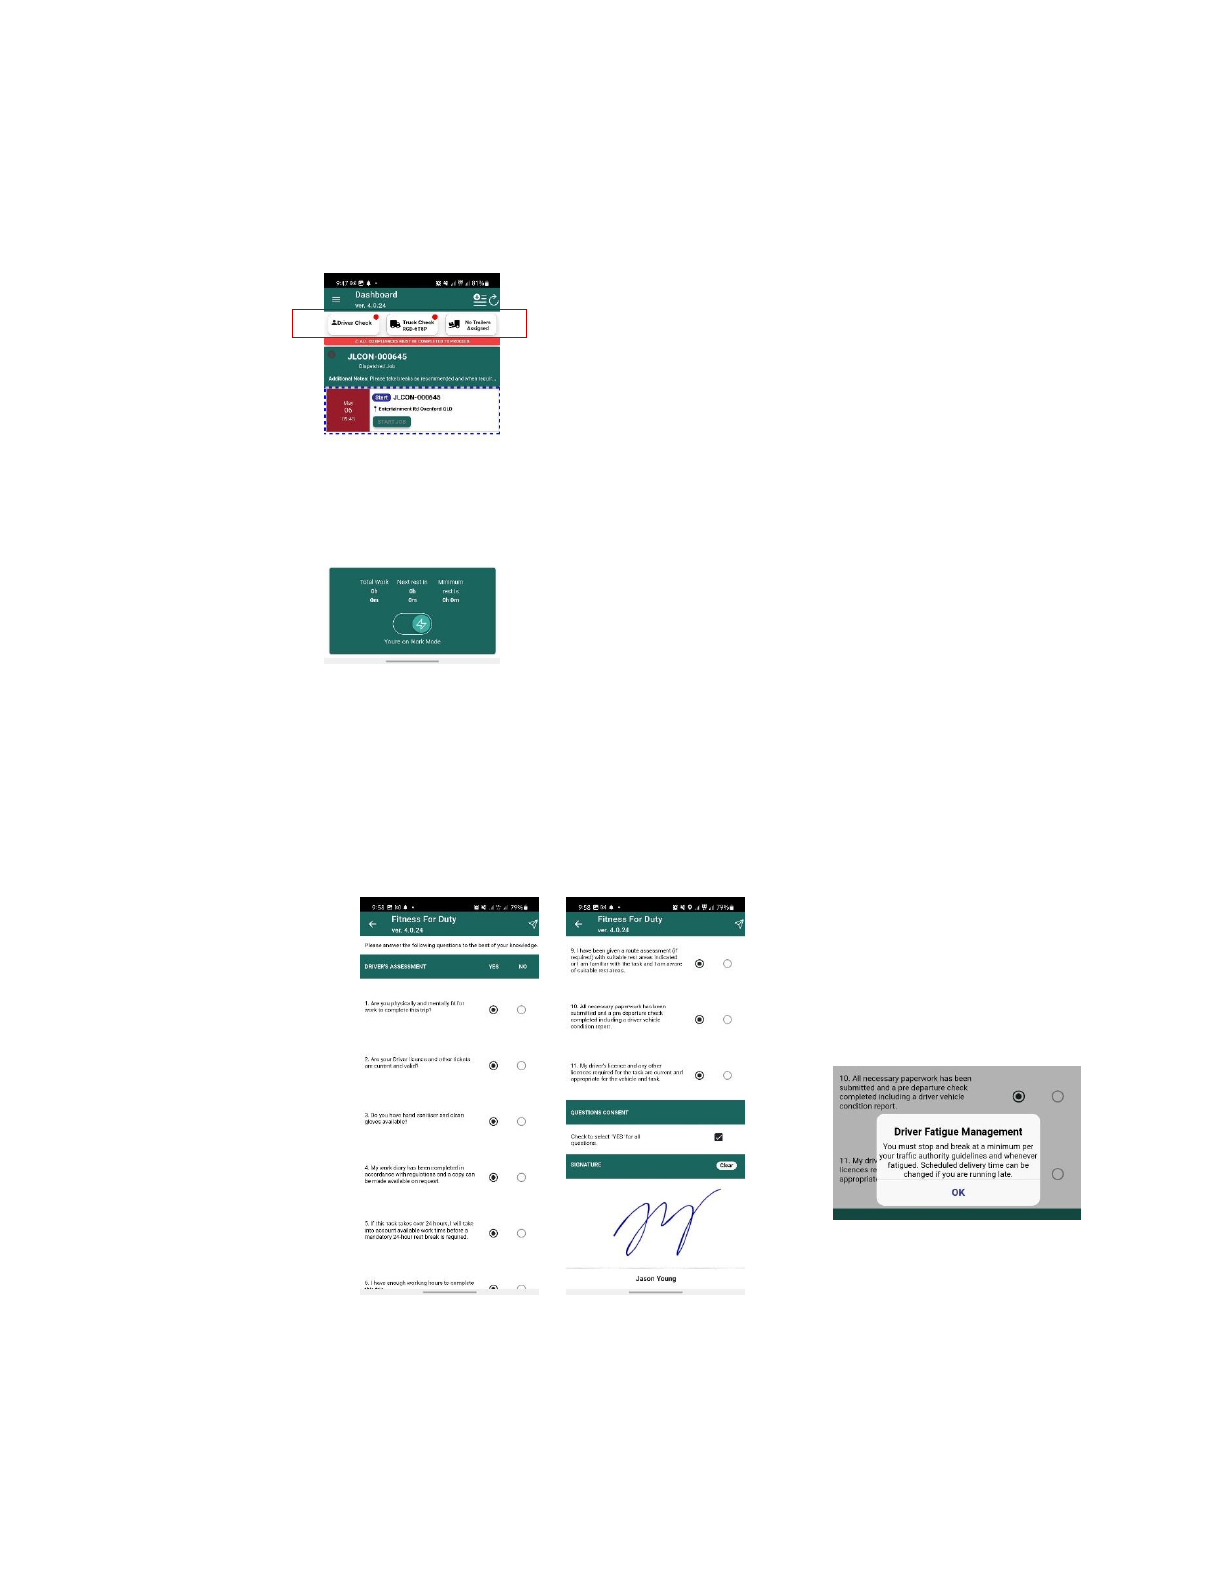
Step 4: Then, prior to starting the trip, you must complete the compliance requirements, which
include the Driver Check and Truck Check. (Note: Trucks are the only mode of transportation used for
local jobs, which is why no trailers are assigned.)
Fig 23. Compliance
A. DRIVER Check – All drivers are required to accomplish the test daily. It is a series of
questions designed to ensure that each driver is in good physical condition before being
assigned to a job. The questionnaire is answerable by Yes or No, and the form must be
signed by the driver to be completed. (Fig. 24 driver check and Fig. 25 driver check sign)
Fig 24. Driver Fitness Questionnaire
Fig 30. Pop up message
Then, a message pops up
after you fill out the form.
B. TRUCK check – Vehicle inspection is a critical component in the logistics industry. It is
crucial to see if the vehicle's documents and licenses are still valid, as well as to thoroughly
inspect the vehicle for damage. The questionnaire requires a YES or NO response and a
date for license expiration. The signature of the driver is also required to complete the form.
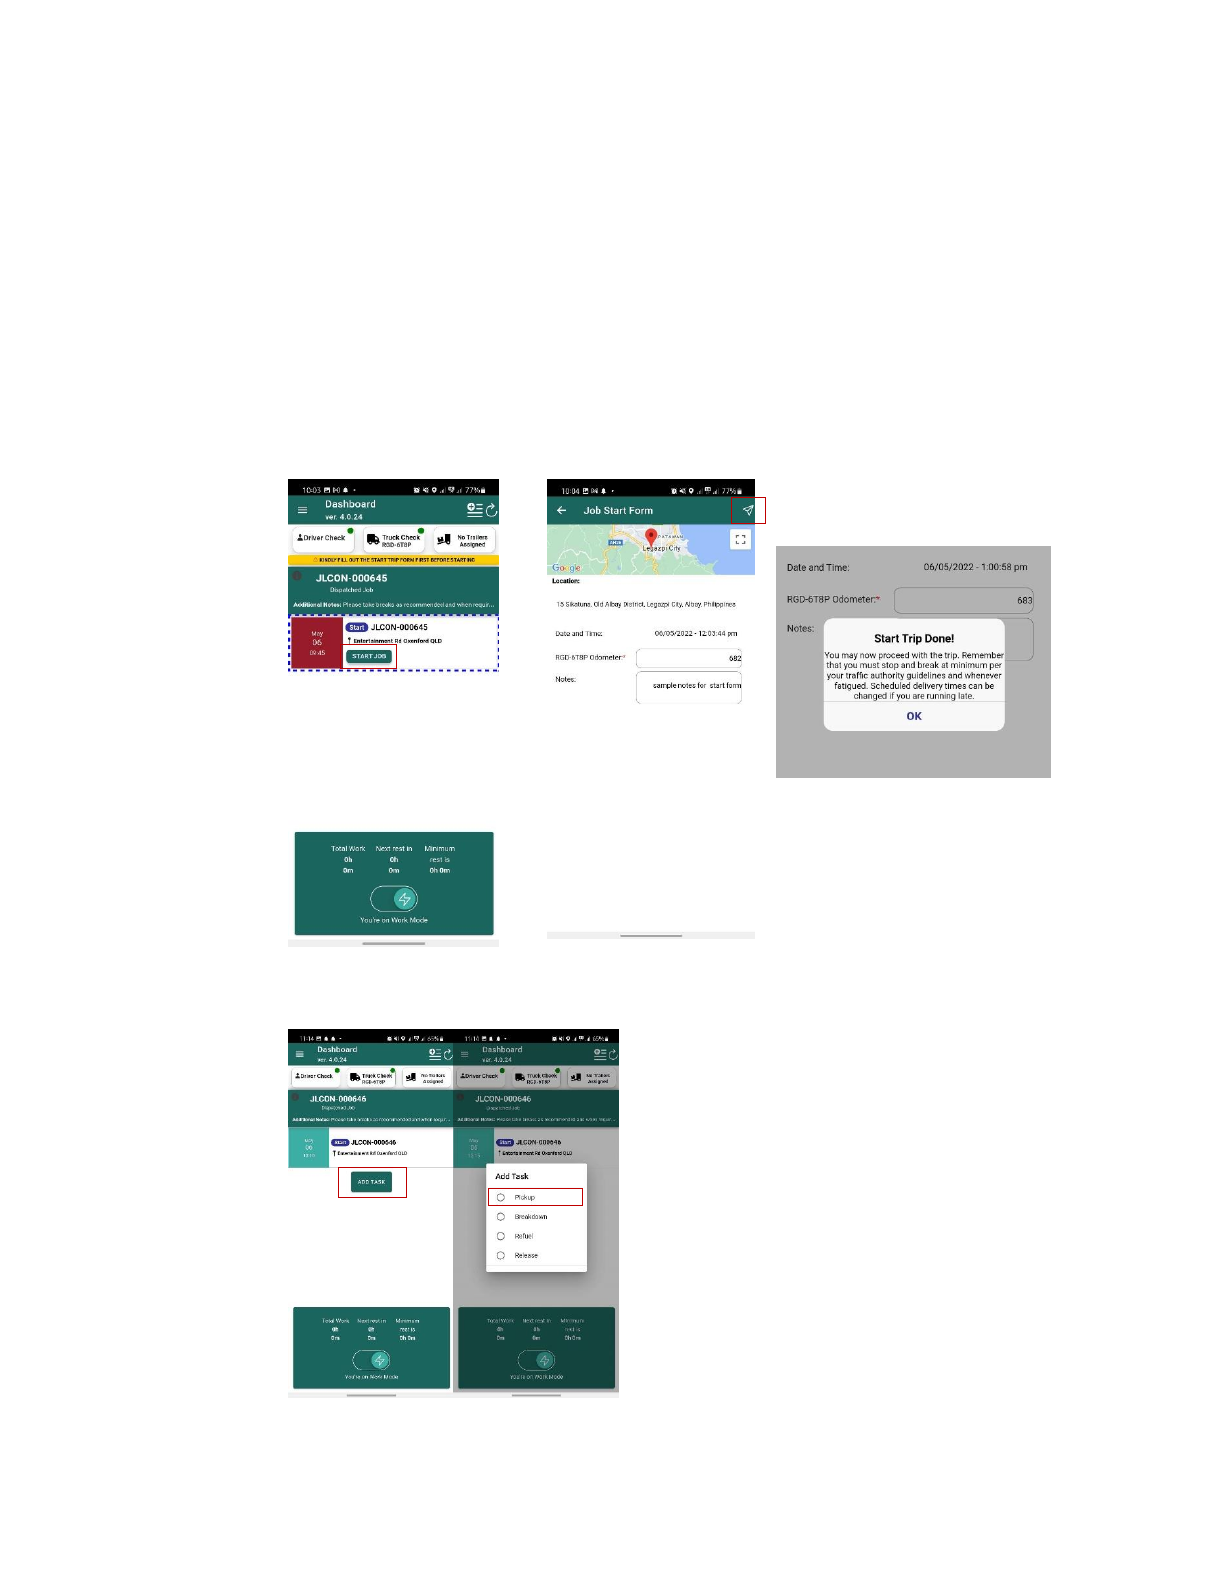
Step 5: After you have completed the compliance requirements, you can start the job by filling out
the job start form and clicking the submit button. (Fig 28. & 29) Then a pop-up message will appear
indicating that you may now proceed with the job. (Fig 31)
Step 6. Click the "add task" button and select a task from the pop-up message. (Fig 32 & 33)
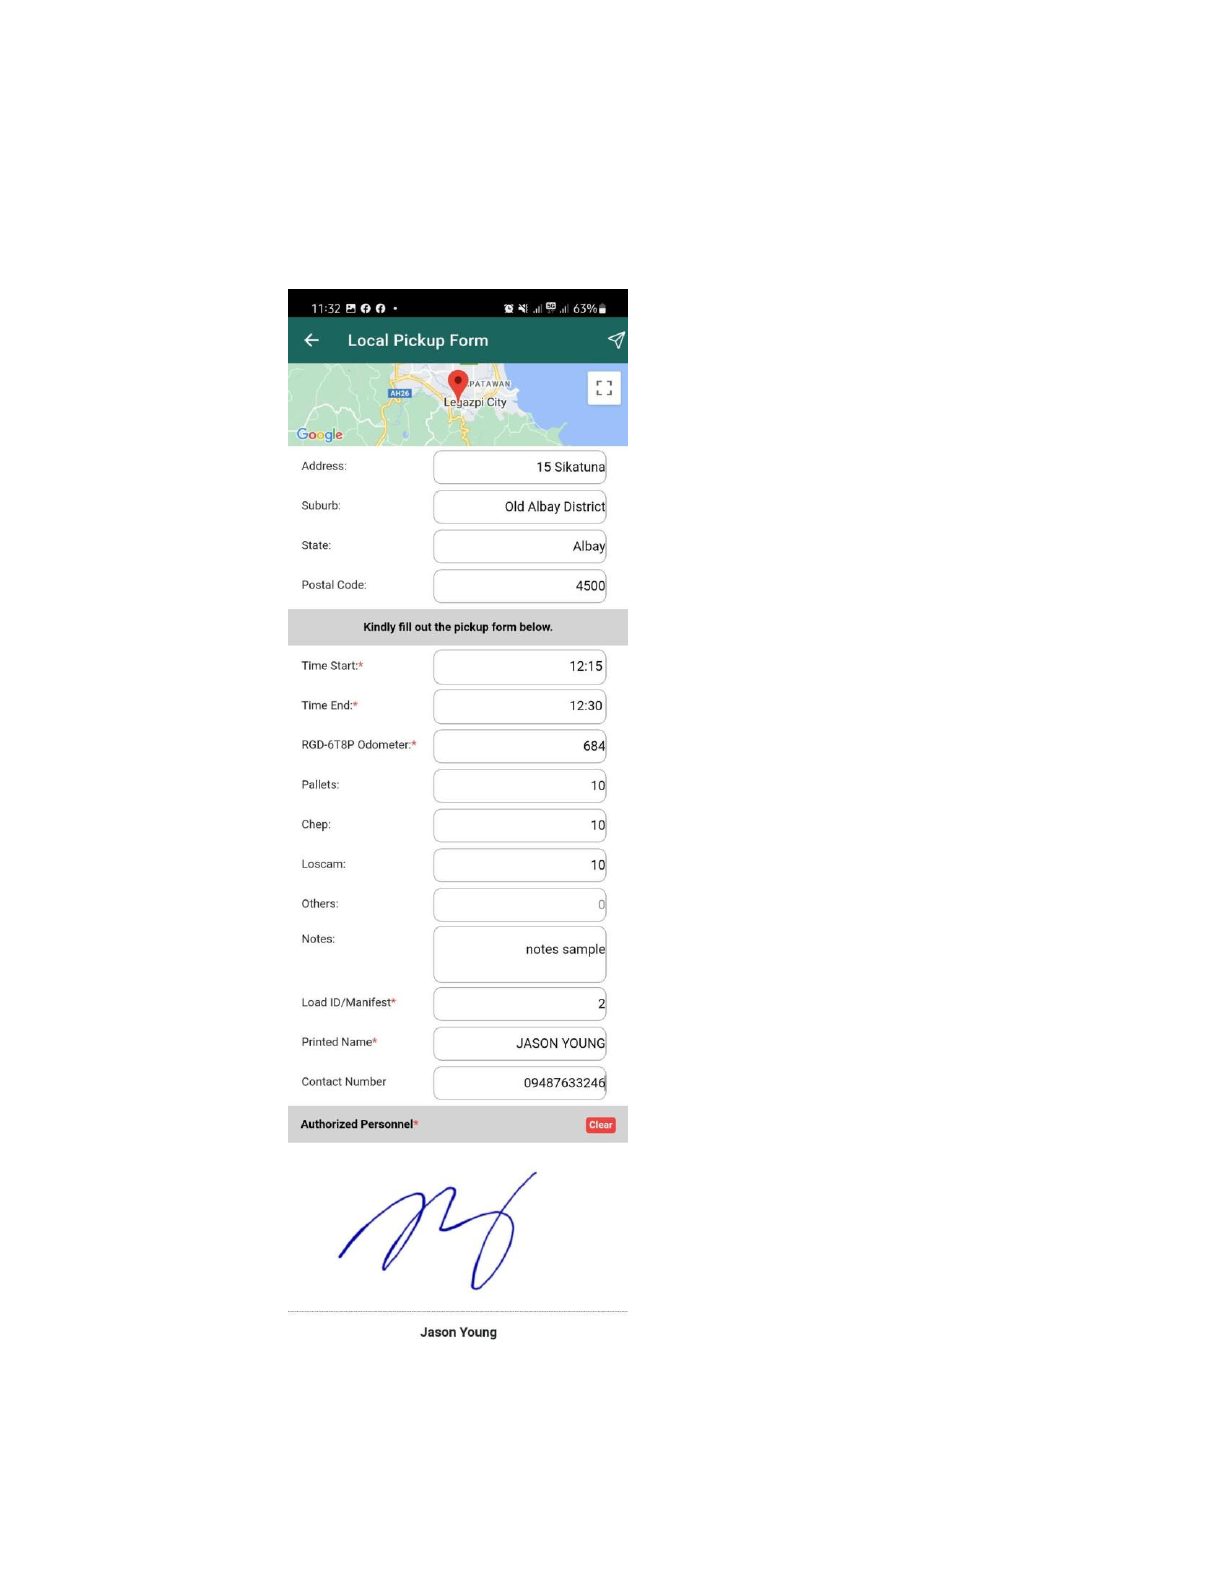
Step 7: By selecting "Pickup," you will be directed to the Local Pickup Form. Figure 34shows how
to fill out the form with the necessary information. Then, to save the form, click the submit button.
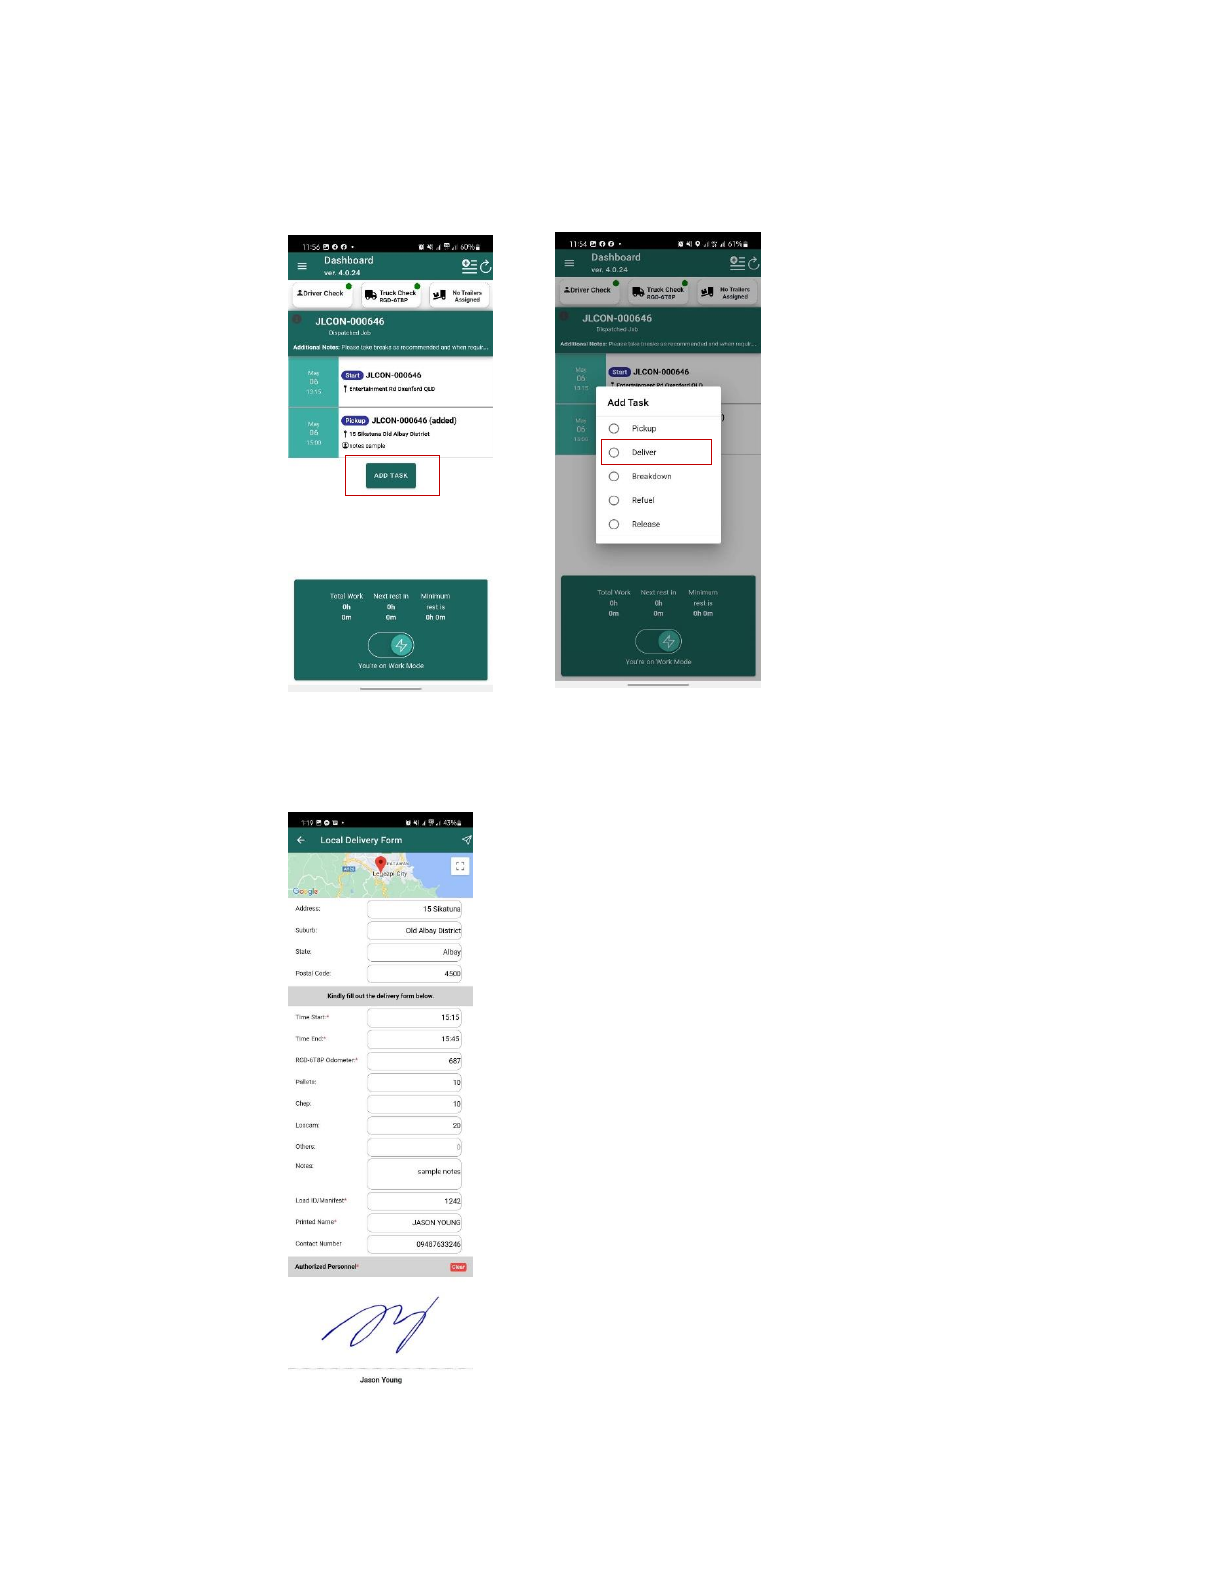
Step 8: Then proceed now to adding another task by clicking the “Add Task” button and selecting
“Deliver.” (Fig. 35 & 36)
Step 9: By selecting "Deliver," you will be directed to the Local Delivery Form. Figure 37 shows how
to fill out the form with the necessary information. Then, to save the form, click the submit button.
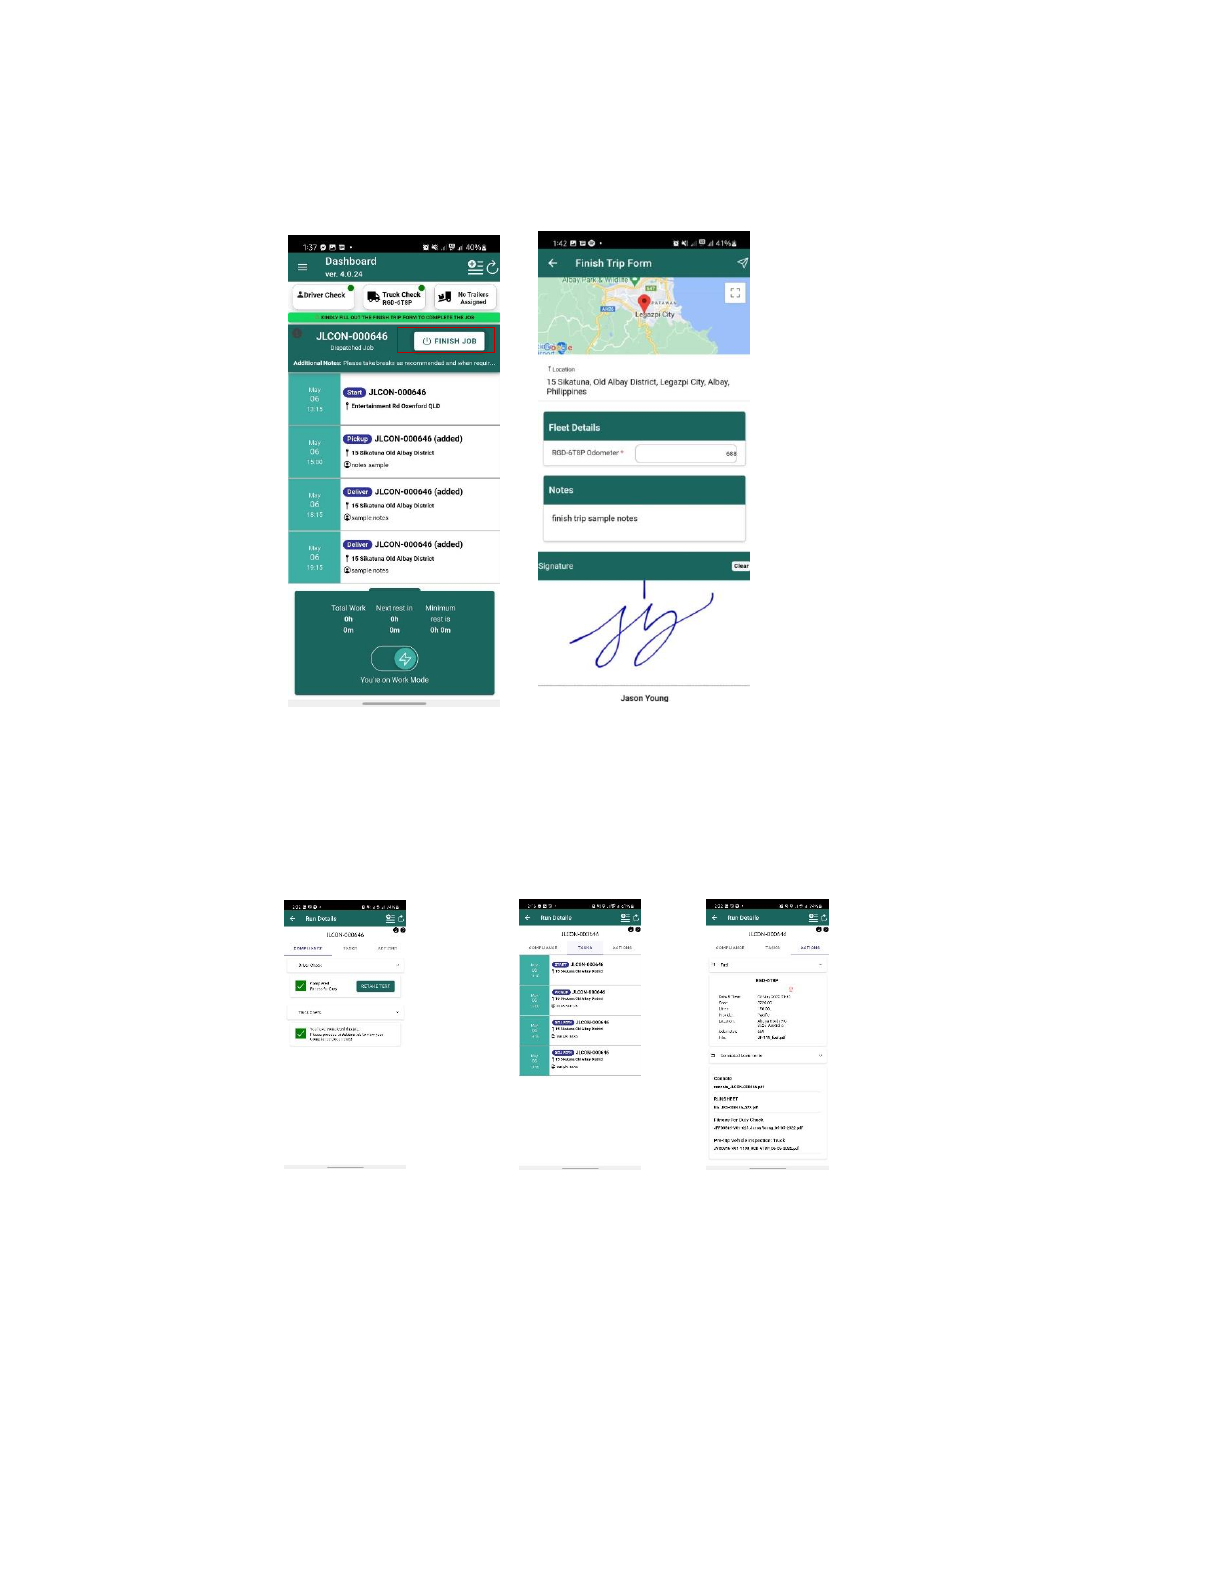
Step 10: Then, click the "Finish Job" button as shown in Figure 38. It will take you to the finish trip
form, which you must complete (Fig 39 finish trip form). Click the submit button to save the form.
Step 11: You have now successfully completed ajob! You can checkthe status of a completed job
by visiting to the Jobs page and clicking on the completed job. It will take you to the "run details" section,
where you will find the compliance tab, tasks tab, and actions tab.
Fig 41. Compliance tab Fig 40. Tasks tab Fig 42. Actions tab
Compliance tab - displays the
results of completed driver and
truck checks.
Tasks – displays detailed
information about the
completed job's flow.
Actions tab – displays the
finished job's compliance
documents and fuel record.

Note: Additionally, the refuel, release, and breakdown activities are included in the "Add Task" sectionof the
Local Job. Apart from Pickup and Deliver, the purpose of each task is as follows.
• Refuel – For adding fuel receipts and records.
• Release – For terminating Job.

